Let’s say you’ve created an add-on. Like many people who first create add-ons, yours is a relatively simple thing that you’ve been able to keep in a single Python file. Perhaps you started with one of the handy templates that come with Blender and you’ve just continued building from there. However, now you want to share it with other people. Sure, you can certainly just share your .py file, but that’s really not ideal. Instead, it’s better to build your add-on as a multi-file package or bundle. This approach gives you quite a few advantages:
- You can have separate files for documentation and licensing. For example, you can have a specific
READMEfile that lets people know what your add-on does and the basics of how to use it. Also, best practice for licensing is to have a separateLICENSEfile that comes with your add-on. - Websites for selling add-ons, like Blender Market, expect deliverable add-ons to be bundled in a ZIP file that users can install directly through the Blender interface.
Software forges like GitHub work better with multiple files in a folder. This way you have a central place to manage your code as well as take bug reports, patches, and feedback. - With multiple files, it’s easier to break up functionality into smaller logical pieces. This practice makes your code easier to maintain and also makes it easier for you to add more features in the future.
It would be nice if it were as simple as taking your Python file and dumping it into a folder with a README and a LICENSE file. Unfortunately, if you do that, the bundled ZIP won’t be recognized as a proper Blender add-on. You need to use the proper structure for a multi-file add-on. Giving that structure requires that you make some minor modifications to your code. And that is why this article exists.
TL;DR
Assuming you already have a single-file Blender add-on, here’s the quick rundown on the changes you need to make for it to work in a folder:
- Make a folder
- Add an
__init__.py - Separate core functionality to individual files
- Correctly import from your new files
- Include correct license headers and files
That’s really all there is to it. The real challenge is figuring out the most useful places to break up your code. Fortunately, that’s why we’re going to work through an example.
Let’s get to that example
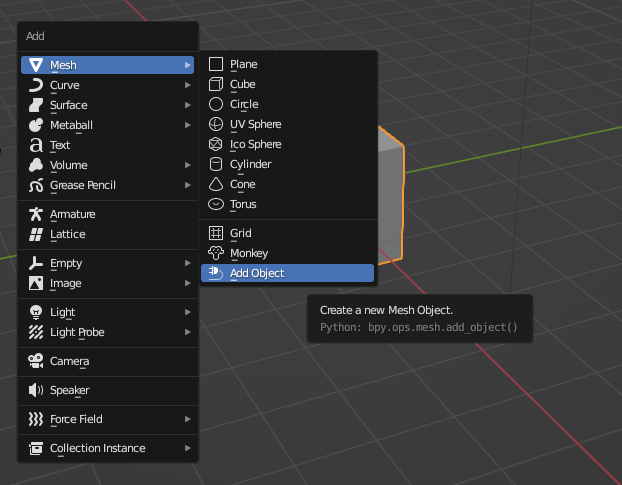
For the purposes of this article, we’re just going to use the example Add Object script that comes with Blender. If you’ve never used any of the template scripts that come with Blender, they’re really handy for helping you get started. From Blender’s Text Editor, navigate to the Templates menu and choose Python ➡ Addon Add Object. Upon doing so, you’ll get a single file of Python code that should look like this:
bl_info = {
    "name": "New Object",
    "author": "Your Name Here",
    "version": (1, 0),
    "blender": (2, 80, 0),
    "location": "View3D > Add > Mesh > New Object",
    "description": "Adds a new Mesh Object",
    "warning": "",
    "doc_url": "",
    "category": "Add Mesh",
}


import bpy
from bpy.types import Operator
from bpy.props import FloatVectorProperty
from bpy_extras.object_utils import AddObjectHelper, object_data_add
from mathutils import Vector


def add_object(self, context):
    scale_x = self.scale.x
    scale_y = self.scale.y

    verts = [
        Vector((-1 * scale_x, 1 * scale_y, 0)),
        Vector((1 * scale_x, 1 * scale_y, 0)),
        Vector((1 * scale_x, -1 * scale_y, 0)),
        Vector((-1 * scale_x, -1 * scale_y, 0)),
    ]

    edges = []
    faces = [[0, 1, 2, 3]]

    mesh = bpy.data.meshes.new(name="New Object Mesh")
    mesh.from_pydata(verts, edges, faces)
    # useful for development when the mesh may be invalid.
    # mesh.validate(verbose=True)
    object_data_add(context, mesh, operator=self)


class OBJECT_OT_add_object(Operator, AddObjectHelper):
    """Create a new Mesh Object"""
    bl_idname = "mesh.add_object"
    bl_label = "Add Mesh Object"
    bl_options = {'REGISTER', 'UNDO'}

    scale: FloatVectorProperty(
        name="scale",
        default=(1.0, 1.0, 1.0),
        subtype='TRANSLATION',
        description="scaling",
    )

    def execute(self, context):

        add_object(self, context)

        return {'FINISHED'}


# Registration

def add_object_button(self, context):
    self.layout.operator(
        OBJECT_OT_add_object.bl_idname,
        text="Add Object",
        icon='PLUGIN')


# This allows you to right click on a button and link to documentation
def add_object_manual_map():
    url_manual_prefix = "https://docs.blender.org/manual/en/latest/"
    url_manual_mapping = (
        ("bpy.ops.mesh.add_object", "scene_layout/object/types.html"),
    )
    return url_manual_prefix, url_manual_mapping


def register():
    bpy.utils.register_class(OBJECT_OT_add_object)
    bpy.utils.register_manual_map(add_object_manual_map)
    bpy.types.VIEW3D_MT_mesh_add.append(add_object_button)


def unregister():
    bpy.utils.unregister_class(OBJECT_OT_add_object)
    bpy.utils.unregister_manual_map(add_object_manual_map)
    bpy.types.VIEW3D_MT_mesh_add.remove(add_object_button)


if __name__ == "__main__":
    register()
The add-on itself is pretty simple. It creates an operator that adds a mesh object to your scene. It also inserts that operator as an item in the 3D Viewport’s Add menu. This is our starting point. Now we go through the process of converting this script into multi-file goodness. First step: make a folder for your add-on.
Make a folder
I know. This seems like a really trite thing to include as a step because it’s such a simple and obvious thing. However, it’s also kind of important. For one, if you’re testing your add-on, you want to make sure this folder is located in the correct spot on your hard drive. Fortunately, if you’ve managed to get your single-file add-on to load with Blender, this folder lives in the same place. The official Blender documentation does a good job of letting you know where these paths are, based on your operating system.
All you need to do is pick a name for your folder and put it there. I recommend something clear, but unique. In this example, let’s keep it simple and call it package_example. And if you’re using the example script from Blender’s Text Editor, save that in this folder as add_object.py.
I should note that if you’re working on your add-on in VS Code, there’s a really handy Blender Development extension that hot-reloads your add-on for you while you’re testing it in Blender, and allows you to work from your repository instead of Blender’s add-on folder. However, it does expect that your add-on is in a folder, so it’s good to go through this process regardless.
Add __init__.py
Blender add-ons are Python scripts. For that reason, they follow a lot of the same conventions and patterns that are used in more general Python applications. One of those conventions is the use of the __init__.py file for defining a package, or module. Now, in Python, you can technically just slap an empty __init__.py file in a folder and, POOF!, it’s magically a module. In Blender, we need a little bit more.
At the very least, we need to be able to identify the code in this folder as being a Blender add-on and have the add-on register itself with Blender. First things first: let’s let Blender know that there’s an add-on here. You do this by moving the bl_info dictionary into __init__.py.
In this example, you’re moving this block of text from add_object.py to __init__.py:
bl_info = {
    "name": "New Object",
    "author": "Your Name Here",
    "version": (1, 0),
    "blender": (2, 80, 0),
    "location": "View3D > Add > Mesh > New Object",
    "description": "Adds a new Mesh Object",
    "warning": "",
    "doc_url": "",
    "category": "Add Mesh",
}
From here, if you were to load Blender and check the Add-ons section of Preferences, you’d see Add Mesh: New Object as an available option in there, but if you try to enable the add-on, Blender spits out an error about missing an attribute called “register”.

Basically, Blender’s Python API refers to enabling an add-on as registering it. With the bl_info dictionary in __init__.py, Blender knows there’s an add-on there, but there’s no way to enable it. Blender’s API expects some functions, specifically register() and unregister(), to enable and disable the add-on. These functions should live in __init__.py.
Let’s stub in some placeholders for that at the end of the file. So now your __init__.py should look like this:
bl_info = {
    "name": "New Object",
    "author": "Your Name Here",
    "version": (1, 0),
    "blender": (2, 80, 0),
    "location": "View3D > Add > Mesh > New Object",
    "description": "Adds a new Mesh Object",
    "warning": "",
    "doc_url": "",
    "category": "Add Mesh",
}


def register():
    pass


def unregister():
    pass
Great! Now if you launch Blender, you can technically enable and disable the add-on from Preferences. Of course, you’re not done. Adding the registration functions just allows you to toggle that checkbox without incurring any errors. The actual functionality of your add-on isn’t there yet. In this example, if you enable Add Mesh: New Object and then check the Add menu in Blender’s 3D Viewport, you’ll note that there’s no Add Object menu item there. We need to make that functionality available.
At this point, you might find yourself asking, “Couldn’t I have just renamed add_object.py to __init__.py and been done with the whole thing altogether?” Yes. As a matter of fact, you could have and that absolutely works. However, that approach doesn't really cover a way to separate functionality into multiple files. By starting with an empty __init__.py in this article, you hopefully have a much better sense of what’s necessary to keep in that file when you start separating functionality into other files… which is what’s next!
Separate core functionality into individual files
Here’s the thing. If you ask any ten random Blender add-on developers how to best organize the functions and data in your add-on, you’re going to get ten very different answers. And nearly all of them will be right. Ultimately, you’re going to need to choose what works best for you. The biggest thing is to be consistent. The second biggest thing would be to write down your organization structure. Both “future you” and anyone you may be collaborating with will thank you for that.
For this example, we’re going to take the simple route of keeping the core functionality in the main Python file (in this case, add_object.py) and pushing user interface stuff, along with the registration code in __init__.py. Effectively, that means moving the add_object_button() and add_object_manual_map() buttons out of add_object.py and into __init__.py.
Now your __init__.py should look something like this:
bl_info = {
    "name": "New Object",
    "author": "Your Name Here",
    "version": (1, 0),
    "blender": (2, 80, 0),
    "location": "View3D > Add > Mesh > New Object",
    "description": "Adds a new Mesh Object",
    "warning": "",
    "doc_url": "",
    "category": "Add Mesh",
}


def add_object_button(self, context):
    self.layout.operator(
        OBJECT_OT_add_object.bl_idname,
        text="Add Object",
        icon='PLUGIN')


# This allows you to right click on a button and link to documentation
def add_object_manual_map():
    url_manual_prefix = "https://docs.blender.org/manual/en/latest/"
    url_manual_mapping = (
        ("bpy.ops.mesh.add_object", "scene_layout/object/types.html"),
    )
    return url_manual_prefix, url_manual_mapping


def register():
    pass


def unregister():
    pass
And while we’re at it, let’s go ahead and remove (or comment out) the original registration functions that were in add_object.py. With that, your add_object.py file is this neat and tidy bunch of functional code:
import bpy
from bpy.types import Operator
from bpy.props import FloatVectorProperty
from bpy_extras.object_utils import AddObjectHelper, object_data_add
from mathutils import Vector


def add_object(self, context):
    scale_x = self.scale.x
    scale_y = self.scale.y

    verts = [
        Vector((-1 * scale_x, 1 * scale_y, 0)),
        Vector((1 * scale_x, 1 * scale_y, 0)),
        Vector((1 * scale_x, -1 * scale_y, 0)),
        Vector((-1 * scale_x, -1 * scale_y, 0)),
    ]

    edges = []
    faces = [[0, 1, 2, 3]]

    mesh = bpy.data.meshes.new(name="New Object Mesh")
    mesh.from_pydata(verts, edges, faces)
    # useful for development when the mesh may be invalid.
    # mesh.validate(verbose=True)
    object_data_add(context, mesh, operator=self)


class OBJECT_OT_add_object(Operator, AddObjectHelper):
    """Create a new Mesh Object"""
    bl_idname = "mesh.add_object"
    bl_label = "Add Mesh Object"
    bl_options = {'REGISTER', 'UNDO'}

    scale: FloatVectorProperty(
        name="scale",
        default=(1.0, 1.0, 1.0),
        subtype='TRANSLATION',
        description="scaling",
    )

    def execute(self, context):

        add_object(self, context)

        return {'FINISHED'}
Your core functionality is separated, but Blender still doesn’t know that it exists. Your __init__.py file isn’t importing anything from your neat and tidy file of functional code. Fortunately, that’s easy enough to handle in the next step.
Correctly import from your new files
Back in your __init__.py, you have two things you need to do:
- Import data from your separate Python file
- Include those data as part of registering your Blender add-on
For the first of those two, you just need a single import statement (since we’re just pulling from one file). I typically add this after the bl_info dictionary:
from .add_object import OBJECT_OT_add_object
Note that you don’t need to import your add_object() function since the only thing that calls that function is your OBJECT_OT_add_object class that lives in the same file. And while you’re importing, it’s a good idea to import the bpy module so we can take advantage of the registration functions in bpy.utils. I usually put this before any local imports:
import bpy
All that remains now is registering our operator and user interface bits with Blender, replacing our placeholder pass keywords in the register() and unregister() functions. These can be moved directly from what we had in the add_object.py file (but have since been removed).
With all these changes made, your __init__.py file should look something like this:
bl_info = {
    "name": "New Object",
    "author": "Your Name Here",
    "version": (1, 0),
    "blender": (2, 80, 0),
    "location": "View3D > Add > Mesh > New Object",
    "description": "Adds a new Mesh Object",
    "warning": "",
    "doc_url": "",
    "category": "Add Mesh",
}


import bpy

# Local imports
from .add_object import OBJECT_OT_add_object


def add_object_button(self, context):
    self.layout.operator(
        OBJECT_OT_add_object.bl_idname,
        text="Add Object",
        icon='PLUGIN')


# This allows you to right click on a button and link to documentation
def add_object_manual_map():
    url_manual_prefix = "https://docs.blender.org/manual/en/latest/"
    url_manual_mapping = (
        ("bpy.ops.mesh.add_object", "scene_layout/object/types.html"),
    )
    return url_manual_prefix, url_manual_mapping


def register():
    bpy.utils.register_class(OBJECT_OT_add_object)
    bpy.utils.register_manual_map(add_object_manual_map)
    bpy.types.VIEW3D_MT_mesh_add.append(add_object_button)


def unregister():
    bpy.utils.unregister_class(OBJECT_OT_add_object)
    bpy.utils.unregister_manual_map(add_object_manual_map)
    bpy.types.VIEW3D_MT_mesh_add.remove(add_object_button)
And now when you launch Blender and enable your Add Mesh: New Object add-on, you can jump over to the 3D Viewport and navigate to Add ➡ Mesh ➡ Add Object to verify that the add-on works. Woohoo!
You now have a multi-file add-on that’s fully functional. However, you’re not entirely done. There’s just a little bit of clean-up that you need to do.
Include correct license headers and files
This last step in the process is relatively simple, but vitally important. As we’ve covered in previous articles, Blender add-ons need to be compliant with the GPL. The easiest way to accomplish this is to also release your add-on under the terms of the GPL as well. Of course, to do that, there are some steps you need to make in order to make your choice in licensing clear. All of this is covered in more detail in our how-to article on making your add-on GPL-compliant, but here are the high points for this example:
- Add a
LICENSEfile with the text of the GPL - Include a license notice at the top of each Python file in your add-on
- Add a
READMEfile (this one isn’t really for licensing, but it’s a great way to let your users know about your add-on and how to reach you for support)
For the given files in this example, the only change you need to make to them is adding the license notice at the top of each one. And with the addition of the LICENSE and README files, you can pack your whole folder into a ZIP file to share with other people, or sell to them. In fact, just to fully complete this example, I’ve created a GitHub repository of this example (starting with the single file version and stepping through each change with a commit, so you can follow the commit history as well, if you’re interested.
You can check out the repository (and download the bundled ZIP, if you’re interested) right here: https://github.com/CGCookie/blender_addon_package_example.